How to give read-only access to Xero
Read-only access lets you invite someone into your Xero organisation so they can see your accounts and reports without being able to change, send, approve, or delete anything. People usually grant it so a bookkeeper, accountant, or another adviser can review the books or check how data flows, without any risk to the live records. In Xero this is the "Read only" user role. It costs nothing extra because Xero does not charge per user, it takes only a few minutes to set up, and you can remove the access again at any time. This guide walks through inviting a read-only user, choosing the right role, and revoking access when you are done.
Watch the walkthrough
Access to grant
Read only role (business and accounting). Payroll access is separate and not included.
Who you're granting access to
- Anyone you need to give view-only access to: a bookkeeper, accountant, consultant, or another adviser who needs to review your accounts without changing them.
Before you start
- You need to be the subscriber or have the "Manage users" permission (usually the owner or an admin).
- The email address of the person you are giving access to.
Step by step
- 1
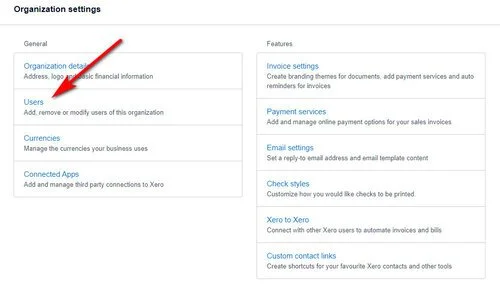
Open Settings, then Users
Sign in to Xero and make sure the correct organisation is selected (top left). Click the organisation name, choose Settings, then under General select Users.
Source: Witches & Weirdos Bookkeeping: How to invite your bookkeeper into your Xero account - 2
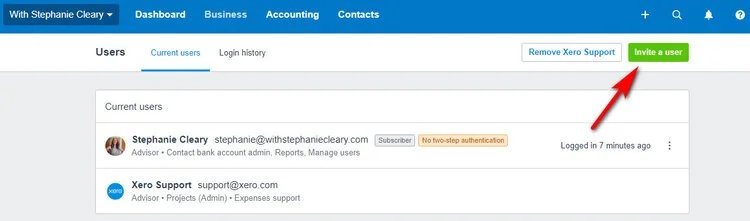
Invite a user
On the Users page you will see your current list of users. Click the "Invite a user" button in the top right.
Source: Witches & Weirdos Bookkeeping: How to invite your bookkeeper into your Xero account - 3
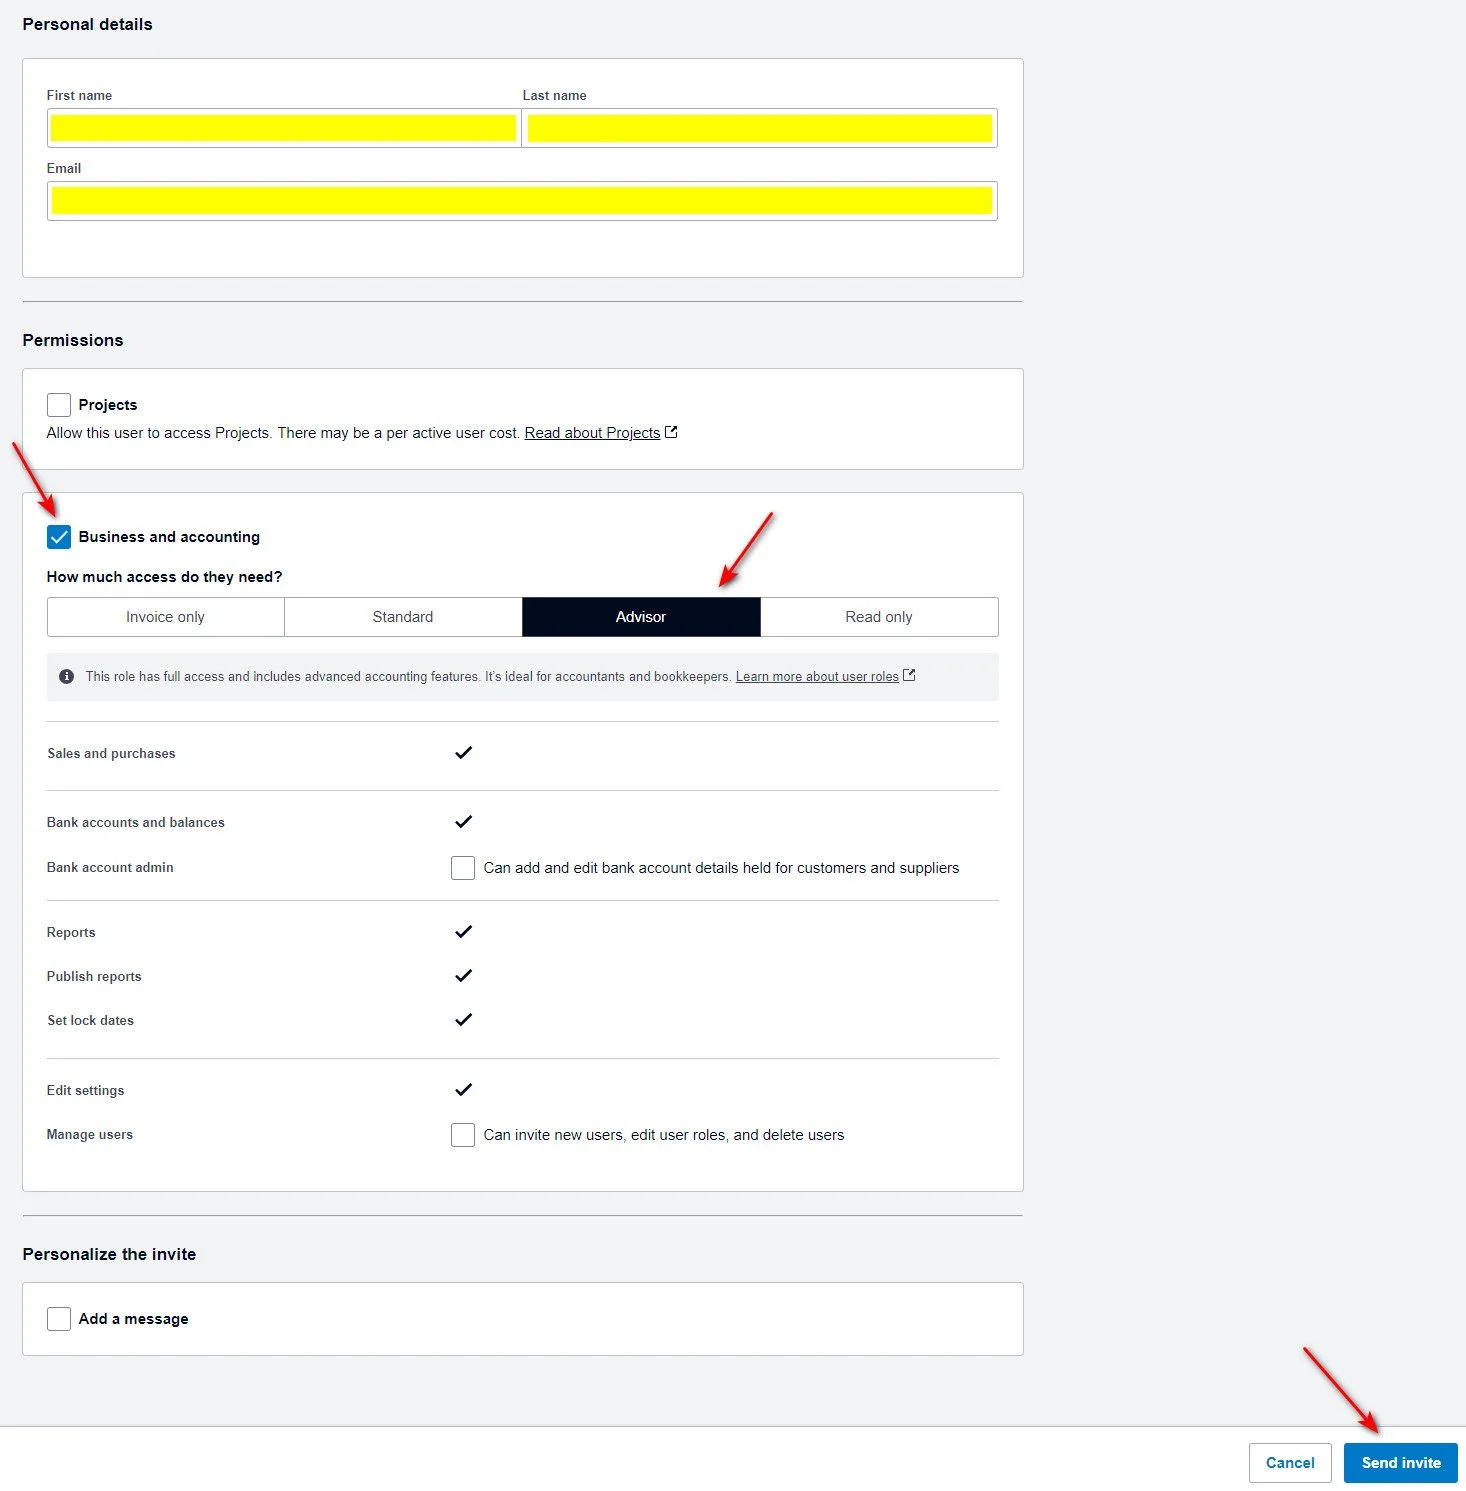
Enter their details and set the role to Read only
Enter the first name, last name, and email address of the person you are giving access to. Under Permissions, tick "Business and accounting", then for "How much access do they need?" choose "Read only". Leave Projects, Payroll, and Expenses unticked unless you have agreed otherwise. The Read only role lets someone view your accounts, transactions, and reports but not create, edit, approve, send, or delete anything.
Source: Witches & Weirdos Bookkeeping: How to invite your bookkeeper into your Xero account - 4
Send the invitation
Click "Send invite". Xero emails the person an invitation, which they need to accept within 14 days (you can resend it if it expires). Once the person you invited accepts, they can view your books but not change anything. Nothing in your records changes when they accept.
Removing access afterwards
- Go to Settings, then Users.
- Click the read-only user in the list.
- Click "Delete user" (or "Remove") and confirm. Their access ends immediately.
If that option is not available
If you would rather not add a user, you can share your screen on a short call and walk an adviser through Xero so they can map it live. You should never need to share your password.
Frequently Asked Questions
No. A Read only user can view your organisation, reports, and transactions, but cannot create, edit, approve, send, or delete anything. It is the safest way to let someone review your accounts.
No. Xero does not charge per user, so adding a read-only reviewer does not change your subscription cost.
The Read only role can view most areas of the business and accounting features, including invoices, bills, contacts, bank balances, account transactions, and existing reports. It cannot run new reports of every type, and it has no payroll access unless that permission is added separately.
The invite link is valid for 14 days. If it expires before the person accepts, go to Settings, then Users, find the pending invite, and resend it.
Go to Settings, then Users, click the read-only user, and choose Delete user. Access ends straight away, so you can grant access for a review and remove it as soon as the work is done.
No, not by default. The Read only business and accounting access is enough for most reviews. If a specific task needs payroll, you can add that permission separately, but it is best to leave it off unless it is genuinely required.
Related guides
Steps last checked against Xero on 2026-06-10.
Based on official Xero documentation: Xero Central: Add a new user to your organisation, Xero Central: User roles and permissions in Xero Business edition, Xero Central: The read only user role explained. Xero is a trademark of its respective owner; this guide is independent and for instruction only.
Want this handled for you?
Clever Ops connects and automates the systems mid-market businesses already run. Book a free assessment and we will map your stack.