How to Create a Cloudbeds API Key (Read-Only)
A Cloudbeds API key lets a connected tool read your property's data directly from your account without anyone logging in to the dashboard or sharing a staff password. Cloudbeds scopes are namespaced as read:, write:, and delete:, so you can grant read-only access by selecting only the read scopes a tool needs (for example read:reservation, read:guest, and read:payment) and leaving every write and delete scope unchecked. That keeps the integration view-only: it can pull bookings, guests, and financial reports but is not granted permission to change or remove anything in your account. This guide covers confirming API access is on your plan, creating a credential entry, generating the key, choosing read-only scopes, authorising the property it can see, and copying the key safely. It also explains how to rotate or revoke the key later. The key is a long-lived bearer credential shown only once, so plan to capture and store it in a password manager the moment it appears.
Keep this credential safe
The Cloudbeds API key is a long-lived bearer credential equivalent to a password, so treat it accordingly. Grant least privilege: tick only the read:* scopes the tool actually needs and never select any write:* or delete:* scope for a read-only integration. The key is revealed only once at creation and cannot be retrieved later, so capture it carefully and store it in a password manager or secrets vault, never in client-side code, spreadsheets, email, or chat. Send it to a collaborator via a password-manager share link rather than a plain message, and always transmit it over HTTPS. Prefer authenticating with a dedicated developer or integration user rather than a personal admin login so the credential is auditable and easy to disable when staff leave, and scope it to a single property unless multi-property reads are genuinely required. Payment, folio, and financial-transaction reads expose guest personal information and financial data, so handle the key and any cached data in line with your Australian Privacy Act and APP obligations. If the key is ever lost or exposed, regenerate (rotate) it rather than reuse it, and schedule periodic rotation since the key does not expire while in active use.
Watch the walkthrough
Access to grant
Restricted/scoped API key set to read-only (only read:* scopes selected, no write:* or delete:*)
Who you're granting access to
- Your bookkeeper, accountant, or another adviser you want to give view-only access.
- A developer or integration partner connecting a reporting or analytics tool to your property data.
Before you start
- A Cloudbeds login (an administrator user is recommended) that holds the 'API and Integration' role privilege for the sections you want to read.
- API Access enabled on your Cloudbeds plan. It is included on some packages and on request for an additional cost on others, so if the API Credentials page is missing, request it via your Cloudbeds account > Integrations > API Credentials.
- A password manager or secrets vault ready to store the key the moment it is shown.
Step by step
- 1
Confirm API access is on your plan
Sign in at https://signin.cloudbeds.com/ with a user that holds the 'API and Integration' role privilege (an administrator user is recommended). If 'API Access' or the API Credentials page is not available, request it via your Cloudbeds account > Integrations > API Credentials. Depending on your package, API Access is either already included or available on request for an additional cost.
Source: Cloudbeds Developers - Property and Group Account API Access - 2
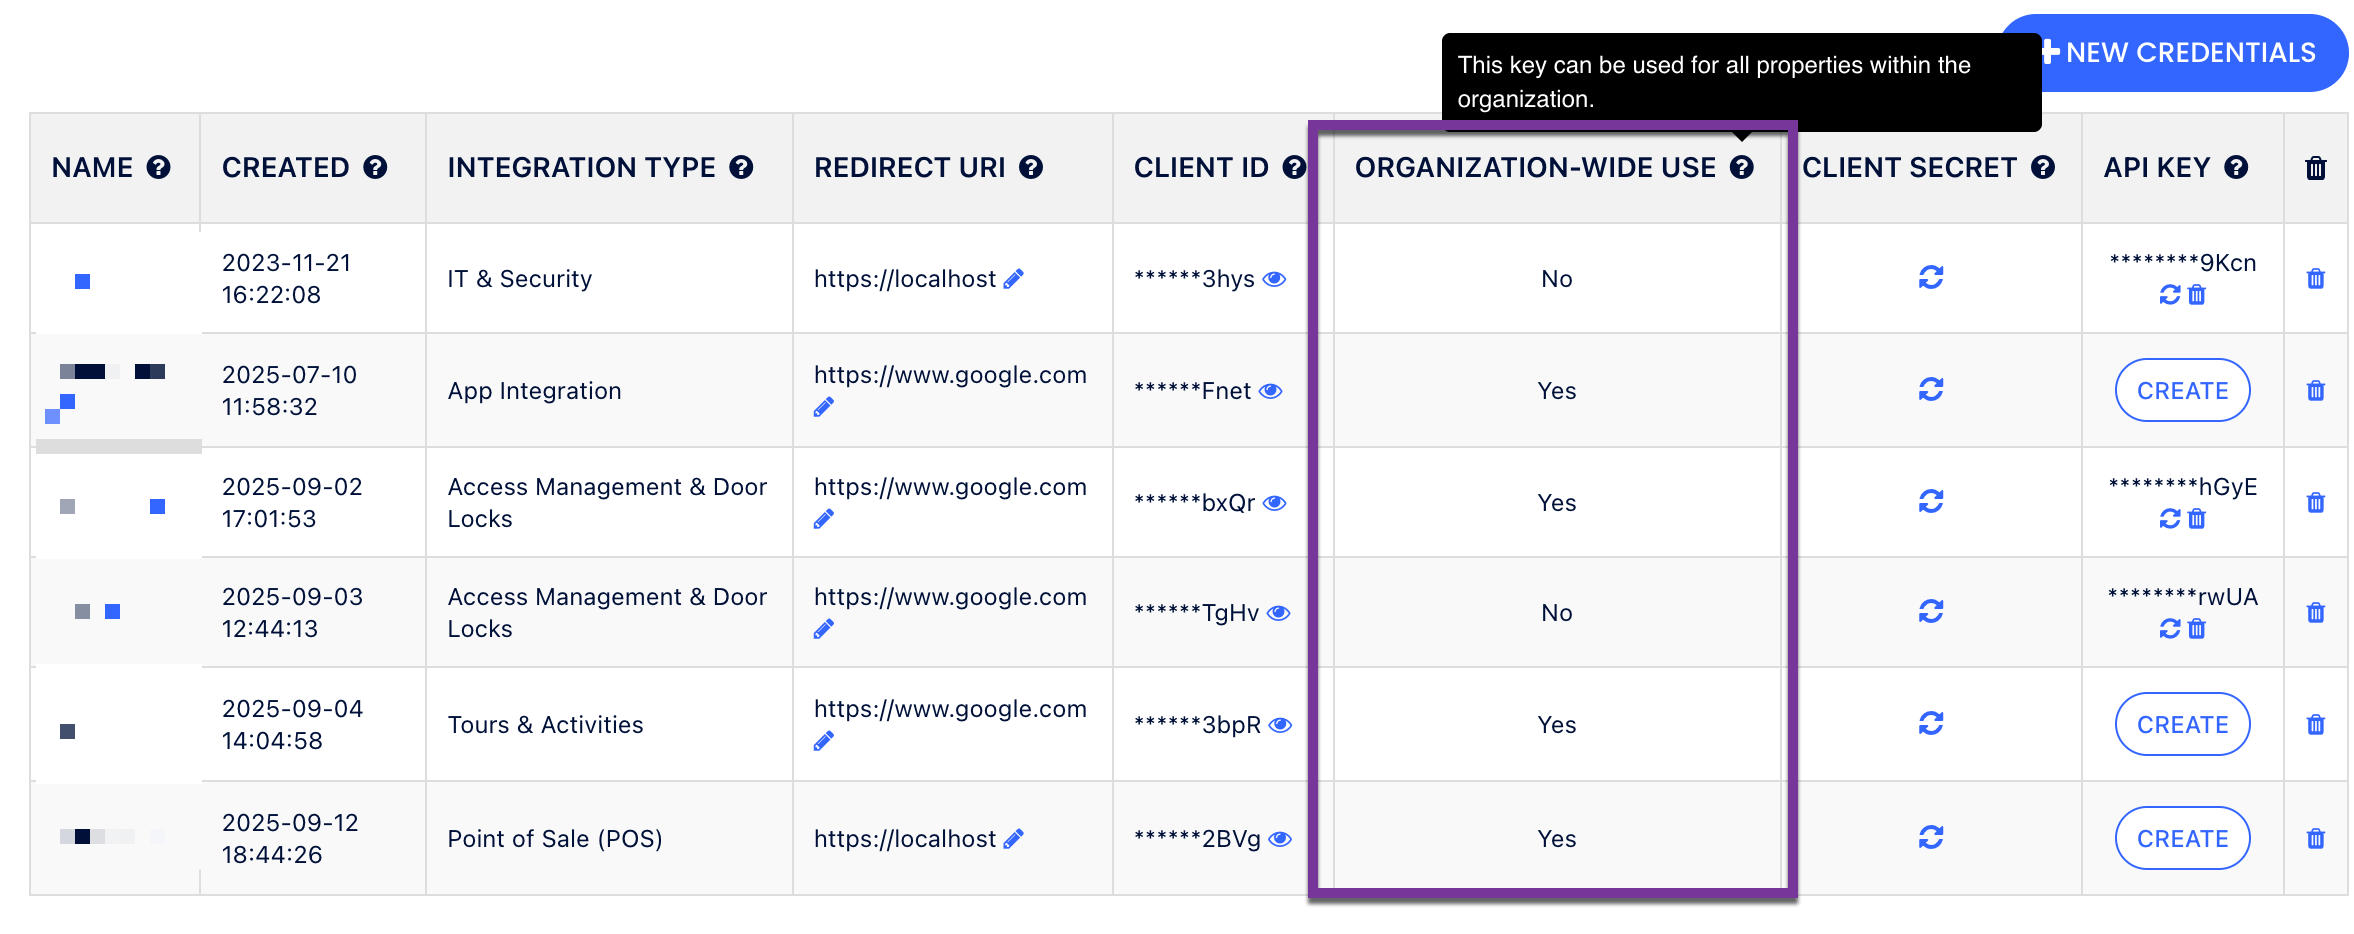
Open the API Credentials page
In the upper right corner, go to Account > Apps & Marketplace (this is labelled Manage > Apps & Marketplace in some UI versions), then open the API Credentials page. This is where existing credentials are listed and new ones are created.
Source: Cloudbeds Developers - Quickstart Guide: API Authentication for self-service API users - 3
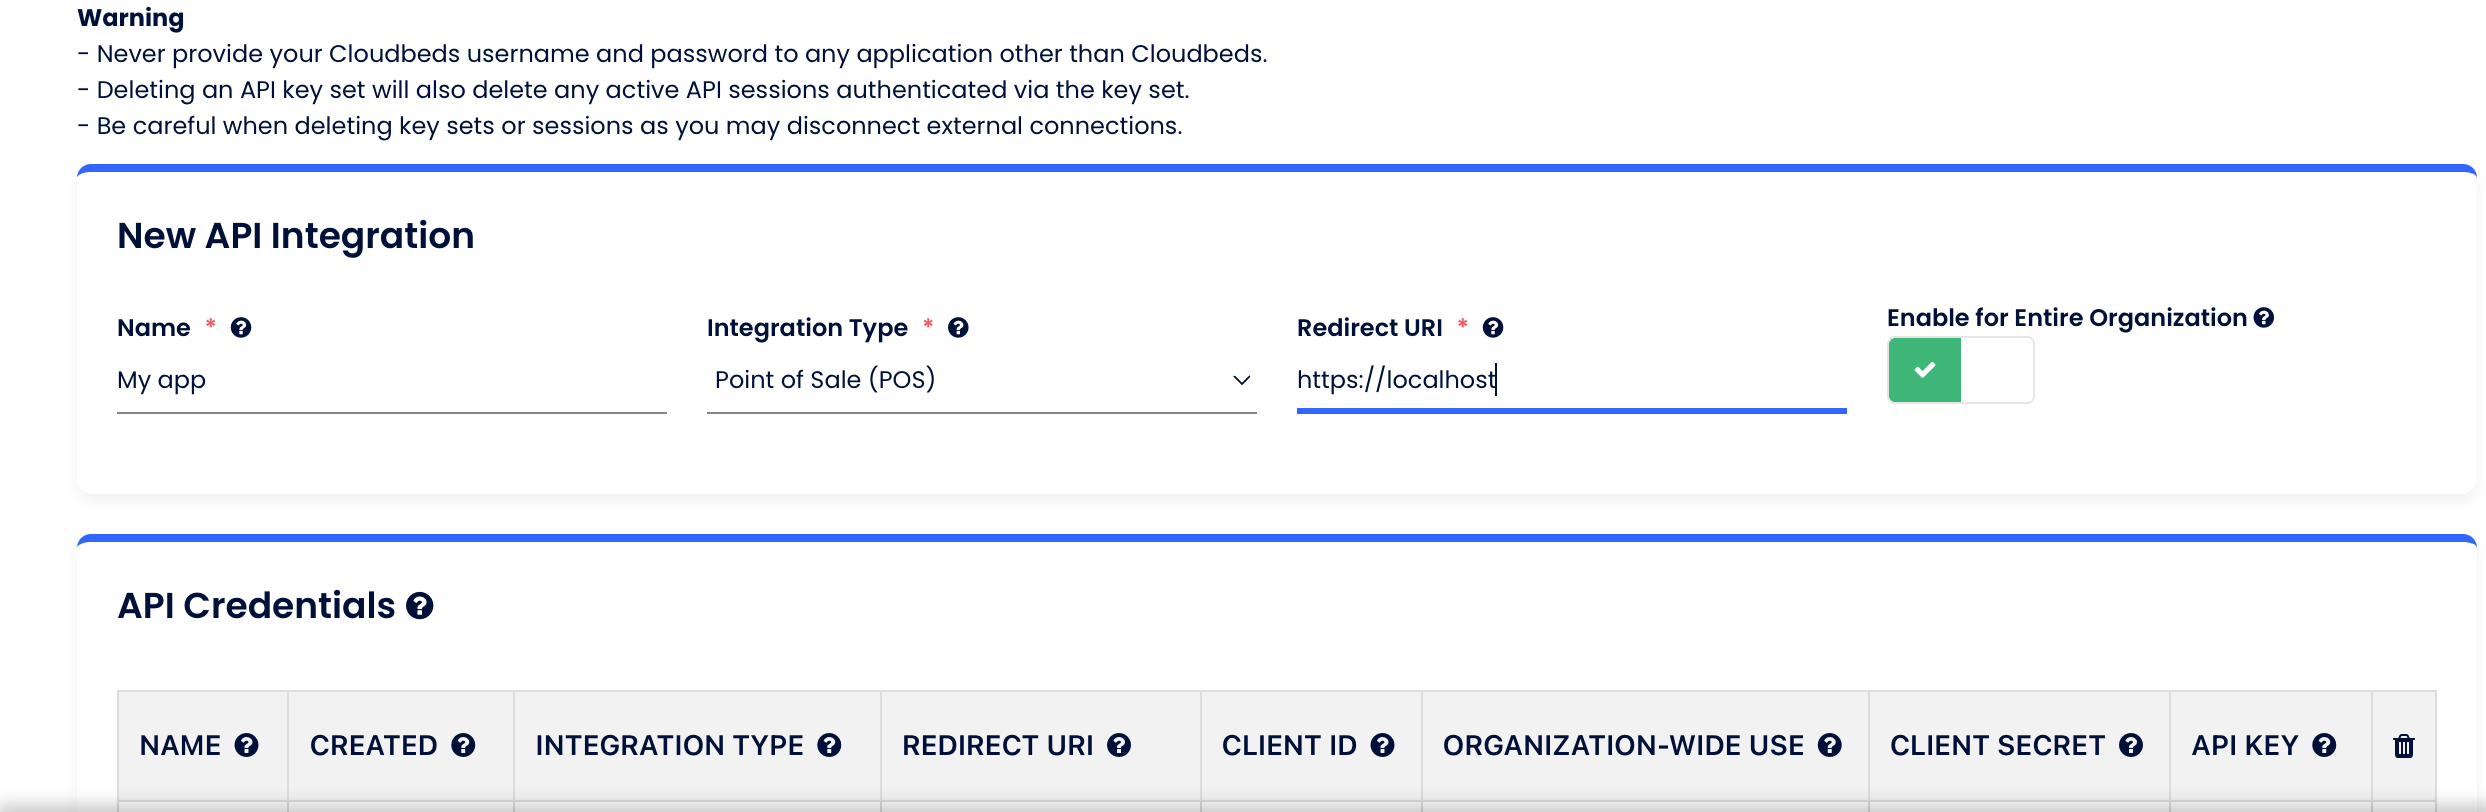
Create a new credential entry
Click '+ New Credentials', then enter a Name for the connected tool and choose the Category that best matches it. In the Redirect URI field you may enter 'https://localhost', because API key use does not require a functioning redirect URL. Then click Save.
Source: Cloudbeds Developers - Quickstart Guide: API Authentication for self-service API users - 4
Generate the API key for that entry
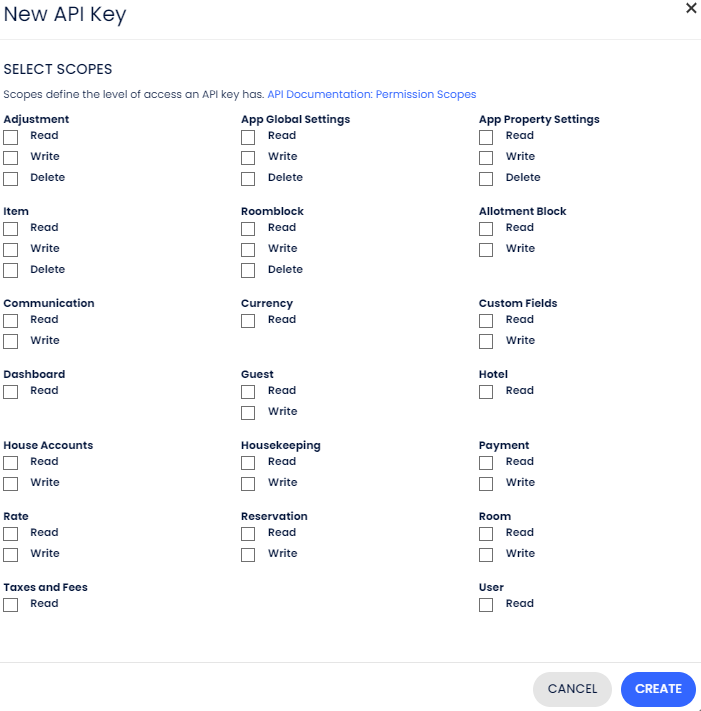
Select the saved credential row in the API Credentials table, scroll right to the 'API Key' column heading, and click 'Create' in that row. This opens the API Scopes selection dialog before the key is revealed.

Source: Cloudbeds Developers - Quickstart Guide: API Authentication for self-service API users - 5
Select read-only scopes only
In the API Scopes dialog, tick only the read scopes the tool needs, such as read:reservation, read:guest, read:payment, read:item, and read:dataInsightsFinancialTransactions. Leave every write:* and delete:* scope unchecked so the key is granted view-only permissions, then click 'Create' in the lower right. Scope availability can vary by the account's enabled modules and plan tier, so confirm the exact scope names in the live dialog.
Source: Cloudbeds Developers - Quickstart Guide: API Authentication for self-service API users - 6
Enter your login and approve the scopes
You will be prompted to enter your Cloudbeds login details and to approve the selected read scopes. A property-level self-service key is scoped to the single property that requested it. If you need one key that reads across multiple properties in a group, that is a group-account or OAuth path rather than this self-service flow (see Fallback).
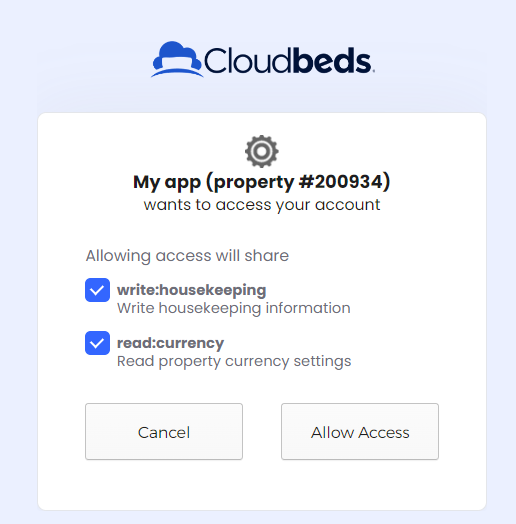
Source: Cloudbeds Developers - Quickstart Guide: API Authentication for self-service API users - 7
Copy and store the key
The API key (starting cbat_) is revealed only during this process, so copy it immediately and paste it into your password manager or secrets vault. It cannot be viewed again after the dialog closes. The key does not expire as long as it is used at least once every 30 days.
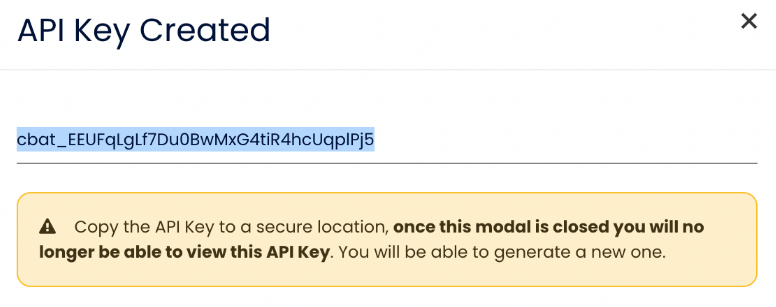
Source: Cloudbeds Developers - Quickstart Guide: API Authentication for self-service API users
Removing access afterwards
- Sign in at https://signin.cloudbeds.com/ and open Account (or Manage) > Apps & Marketplace > API Credentials.
- Find the credential row for the connected tool and look at the 'API Key' column.
- To rotate, click the regenerate icon to issue a new key. The old key stops working immediately and the new key is again displayed only once, so update the tool's stored secret straight away.
- To revoke, click the trash icon to delete the key, which immediately cuts the tool's access.
- Note that a key auto-disables after 30 days of non-use, so an unused key effectively lapses, and Cloudbeds reserves the right to disable a key it judges to be compromised and require you to create a replacement.
If that option is not available
If your Cloudbeds package does not already include API Access, the API Credentials page may be unavailable. In that case, request access via your Cloudbeds account > Integrations > API Credentials; depending on your package, Cloudbeds will either enable it or discuss adding it for an additional cost before you can create a key. If you need one credential to read across multiple properties under a group or organisation, that group-level access is not part of the self-service flow and must be requested from Cloudbeds directly by email (group accounts), or set up via the OAuth 2.0 method. The separate Technology Partner OAuth and Marketplace path is intended for vendors building a listed app and is not needed to connect a single tool to one property's own data.
Frequently Asked Questions
Yes. Cloudbeds scopes are namespaced as read:, write:, and delete:, so you create a read-only key by ticking only the read:* scopes the tool needs and leaving every write and delete scope unchecked. The key is then granted permission to pull data but not to change or remove anything in your account.
Sign in at https://signin.cloudbeds.com/, then in the upper right go to Account > Apps & Marketplace (it is labelled Manage > Apps & Marketplace in some UI versions) and open the API Credentials page. Both menu paths lead to the same page.
API Access is included on some Cloudbeds packages and is available on request for an additional cost on others. If the API Credentials page is missing, request access via your Cloudbeds account > Integrations > API Credentials and Cloudbeds will discuss enabling it for your plan.
There is no single 'payouts' scope. Payment and financial reads are covered by read:payment plus Data Insights read scopes such as read:dataInsightsFinancialTransactions. Other Data Insights read scopes may also be available depending on the account's enabled modules and plan tier, so verify the exact scope names in the live scope dialog.
The cbat_ key is revealed only once and cannot be retrieved again. Open the credential row, click the regenerate icon to issue a fresh key, copy it immediately, and update the tool's stored secret. The previous key stops working as soon as you regenerate.
The key is long-lived and does not expire while it is in active use, but it auto-disables after 30 days of no use. For a read-only integration, schedule periodic rotation anyway, and rotate immediately if the key is ever exposed.
Related guides
Steps last checked against Cloudbeds on 2026-06-15.
Based on official Cloudbeds documentation: Cloudbeds Developers - Quickstart Guide: API Authentication for self-service API users, Cloudbeds Developers - Property and Group Account API Access, Cloudbeds Developers - About Cloudbeds APIs, Cloudbeds Developers - API Reference: Authentication scopes, Cloudbeds Developers - API Keys Authentication Guide for Technology Partners, Cloudbeds Developers - Alternative OAuth 2.0 authentication method, Cloudbeds Help Centre - Apps and Integrations: Self-service API, Cloudbeds Help Centre - Role privileges. Cloudbeds is a trademark of its respective owner; this guide is independent and for instruction only.
Want this handled for you?
Clever Ops connects and automates the systems mid-market businesses already run. Book a free assessment and we will map your stack.